Jenkins
DETAILS: Tier: Free, Premium, Ultimate Offering: GitLab.com, Self-managed, GitLab Dedicated
Moved to GitLab Free in 13.7.
Jenkins is an open source automation server that supports building, deploying and automating projects.
You should use a Jenkins integration with GitLab when:
- You plan to migrate your CI from Jenkins to GitLab CI/CD in the future, but need an interim solution.
- You're invested in Jenkins plugins and choose to keep using Jenkins to build your apps.
This integration can trigger a Jenkins build when a change is pushed to GitLab.
You cannot use this integration to trigger GitLab CI/CD pipelines from Jenkins. Instead, use the pipeline triggers API endpoint in a Jenkins job, authenticated with a pipeline trigger token.
After you have configured a Jenkins integration, you trigger a build in Jenkins when you push code to your repository or create a merge request in GitLab. The Jenkins pipeline status displays on merge request widgets and the GitLab project's home page.
For an overview of the Jenkins integration for GitLab, see GitLab workflow with Jira issues and Jenkins pipelines.
To configure a Jenkins integration with GitLab:
- Grant Jenkins access to the GitLab project.
- Configure the Jenkins server.
- Configure the Jenkins project.
- Configure the GitLab project.
Grant Jenkins access to the GitLab project
-
Create a personal, project, or group access token.
- Create a personal access token to use the token for all Jenkins integrations of that user.
- Create a project access token to use the token at the project level only. For instance, you can revoke the token in a project without affecting Jenkins integrations in other projects.
- Create a group access token to use the token for all Jenkins integrations in all projects of that group.
-
Set the access token scope to API.
-
Copy the access token value to configure the Jenkins server.
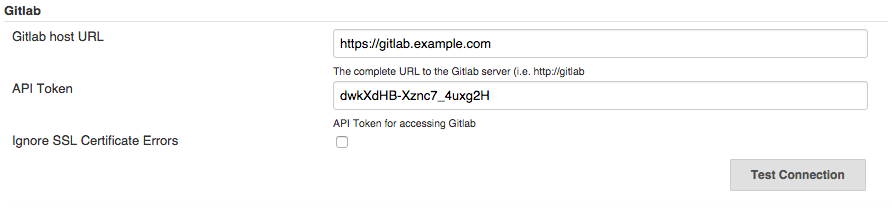
Configure the Jenkins server
Install and configure the Jenkins plugin to authorize the connection to GitLab.
-
On the Jenkins server, select Manage Jenkins > Manage Plugins.
-
Select the Available tab. Search for
gitlab-pluginand select it to install. See the Jenkins GitLab documentation for other ways to install the plugin. -
Select Manage Jenkins > Configure System.
-
In the GitLab section, select Enable authentication for '/project' end-point.
-
Select Add, then choose Jenkins Credential Provider.
-
Select GitLab API token as the token type.
-
In API Token, paste the access token value you copied from GitLab and select Add.
-
Enter the GitLab server's URL in GitLab host URL.
-
To test the connection, select Test Connection.

For more information, see Jenkins-to-GitLab authentication.
Configure the Jenkins project
Set up the Jenkins project you intend to run your build on.
- On your Jenkins instance, select New Item.
- Enter the project's name.
- Select Freestyle or Pipeline and select OK. You should select a freestyle project, because the Jenkins plugin updates the build status on GitLab. In a pipeline project, you must configure a script to update the status on GitLab.
- Choose your GitLab connection from the dropdown list.
- Select Build when a change is pushed to GitLab.
- Select the following checkboxes:
- Accepted Merge Request Events
- Closed Merge Request Events
- Specify how the build status is reported to GitLab:
-
If you created a freestyle project, in the Post-build Actions section, choose Publish build status to GitLab.
-
If you created a pipeline project, you must use a Jenkins Pipeline script to update the status on GitLab.
Example Jenkins Pipeline script:
pipeline {
   agent any

   stages {
      stage('gitlab') {
         steps {
            echo 'Notify GitLab'
            updateGitlabCommitStatus name: 'build', state: 'pending'
            updateGitlabCommitStatus name: 'build', state: 'success'
         }
      }
   }
}
For more Jenkins Pipeline script examples, see the Jenkins GitLab plugin repository on GitHub.
-
Configure the GitLab project
Configure the GitLab integration with Jenkins in one of the following ways.
With a Jenkins server URL
You should use this approach for Jenkins integrations if you can provide GitLab with your Jenkins server URL and authentication information.
- On the left sidebar, select Search or go to and find your project.
- Select Settings > Integrations.
- Select Jenkins.
- Select the Active checkbox.
- Select the events you want GitLab to trigger a Jenkins build for:
- Push
- Merge request
- Tag push
- Enter the Jenkins server URL.
- Optional. Clear the Enable SSL verification checkbox to disable SSL verification.
- Enter the Project name. The project name should be URL-friendly, where spaces are replaced with underscores. To ensure the project name is valid, copy it from your browser's address bar while viewing the Jenkins project.
- If your Jenkins server requires authentication, enter the Username and Password.
- Optional. Select Test settings.
- Select Save changes.
With a webhook
If you cannot provide GitLab with your Jenkins server URL and authentication information, you can configure a webhook to integrate GitLab and Jenkins.
- In the configuration of your Jenkins job, in the GitLab configuration section, select Advanced.
- Under Secret Token, select Generate.
- Copy the token, and save the job configuration.
- In GitLab:
- Create a webhook for your project.
- Enter the trigger URL (such as
https://JENKINS_URL/project/YOUR_JOB). - Paste the token in Secret Token.
- To test the webhook, select Test.
Related topics
- GitLab Jenkins Integration
- How to set up Jenkins on your local machine
- How to migrate from Jenkins to GitLab CI/CD
- Jenkins to GitLab: The ultimate guide to modernizing your CI/CD environment
Troubleshooting
Error during GitLab configuration - "Connection failed. Please check your settings"
While configuring GitLab, you might get an error that states "Connection failed. Please check your settings".
This issue has multiple possible causes and solutions:
| Cause | Workaround |
|---|---|
| GitLab is unable to reach your Jenkins instance at the address. | If your GitLab instance is self-managed, ping the Jenkins instance at the domain provided on the GitLab instance. |
| The Jenkins instance is at a local address and is not included in the GitLab installation's allowlist. | Add the instance to the GitLab installation's allowlist. |
| The credentials for the Jenkins instance do not have sufficient access or are invalid. | Grant the credentials sufficient access or create valid credentials. |
The Enable authentication for /project end-point checkbox is not selected in your Jenkins plugin configuration
|
Select the checkbox. |
Error in merge requests - "Could not connect to the CI server"
You might get an error that states Could not connect to the CI server in a merge
request if GitLab did not receive a build status update from Jenkins through the
Commit Status API.
This issue occurs when Jenkins is not properly configured or there is an error reporting the status through the API.
To fix this issue:
- Configure the Jenkins server for GitLab API access.
- Configure the Jenkins project, and make sure that, if you create a freestyle project, you choose the "Publish build status to GitLab" post-build action.
Merge request event does not trigger a Jenkins pipeline
This issue can occur when the request exceeds the webhook timeout, which is set to 10 seconds by default.
For this issue, check:
-
The integration webhook logs for request failures.
-
/var/log/gitlab/gitlab-rails/production.logfor messages like:WebHook Error => Net::ReadTimeoutor
WebHook Error => execution expired
On self-managed GitLab instances, you can fix this issue by increasing the webhook timeout value.
Enable job logs in Jenkins
To troubleshoot an integration issue, you can enable job logs in Jenkins to get more details about your builds.
To enable job logs in Jenkins:
- Go to Dashboard > Manage Jenkins > System Log.
- Select Add new log recorder.
- Enter a name for the log recorder.
- On the next screen, select Add and enter
com.dabsquared.gitlabjenkins. - Make sure that the Log Level is All and select Save.
To view your logs:
- Run a build.
- Go to Dashboard > Manage Jenkins > System Log.
- Select your logger and check the logs.